Friday, June 10, 2011

It's All About The Pot

Oppressive heat and humidity can pretty much guaranty I will be looking for ways to feed the family that does NOT involve turning on the oven. Or stove top. Or toaster oven. Or microwave... This week we had plenty of that kind of weather, and a friend reminded me of the beauty of the crock pot. It puts off no heat while it sits quietly on the counter, cooking up whatever yummy concoctions you can come up with. The challenge for me was to overcome my image of crock pot food being heavy, comfort-type meals better suited for cold weather. I'm happy to say I made two successful crock pot meals that were equally easy, healthy, and enjoyable on a hot day.

Crock pot meal #1: Crock Pot Turkey Joes
My version of sloppy joe's has a sneaky way of adding in extra nutrition, and cutting down on fat. I was inspired by Jessica Seinfeld's book, but don't have the patience or time to make numerous purees of vegetables to "hide" in my kids' food. And, my kids do a pretty good job of eating their vegetables. But, nonetheless, sometimes an extra boost can help make up for the popsicles and ice cream truck treats that come with summer. I started this a little after noon, and it was great for dinner around 6:00. Best of all I didn't have to stand over a hot stove browning meat!
  • 1 pound lean ground turkey
  • 1/2 can black beans (drained and rinsed)
  • 1 packet Sloppy Joe seasoning
  • 1 small can tomato sauce
  • 1/4 cup ketchup
  • 1 jar organic/ all natural spinach and carrots baby food (trust me, you can't taste it a bit)
With crock pot on high, mix in the turkey and seasoning packet (don't follow directions on packet to add water). The turkey will absorb the seasoning and begin to cook. Stir occasionally for the first half hour.

Next, add tomato sauce, baby food, beans, and ketchup. I also sprinkle in onion powder and garlic powder, but it's not necessary. Mix well, put on the lid and let it go! I turned down the heat to "keep warm" after an hour and propped the lid open slightly to let out steam so I didn't end up with chili instead.
Serve on your choice of whole grain bread or bun with a fresh fruit salad and you have yourself a tasty summer meal.

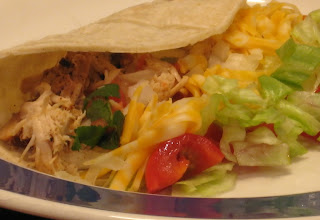
Crock Pot Meal #2: Taco Bar Chicken with Rice
This is a fun meal for entertaining or feeding a crowd without heating up the kitchen. The chicken and rice cook in the crock pot, leaving only fresh veggies and condiments to prepare. It's also nice for picky eaters since you serve it taco bar style allowing everyone to choose their own toppings.

In the crock pot:
  • 2-4 cups shredded chicken (prepared store bought rotisserie chicken works great, or make your own shredded chicken in bulk, freeze and store for quick no-cook recipes in the future. Check out Making Bulk Shredded Chicken in Crock Pot)
  • 1/2 cup rice
  • 1/2 cup orzo pasta
  • taco seasoning packet
  • 1 can Ro-Tel tomatoes with green chili
  • 1/2 cup water
  • 1 TBSP olive oil
  • lime pepper (optional, to taste)
On the side: (the possibilities are endless!)
  • diced tomatoes
  • diced jalepeno
  • shredded cheese
  • shredded lettuce
  • diced avocado or prepared guacamole
  • sour cream
  • taco and/or hot sauce
  • chopped onion
  • sliced black olives

Combine all ingredients in the crock pot and mix well. Simmer on high for about 10 minutes covered, and then add in shredded chicken, replace lid, turn to low and let it go. Once all liquid is absorbed and rice is tender, mix well to fluff rice and pasta, and turn to "keep warm" until you are ready to eat.

Serve with whole wheat soft tortillas, hard shell tacos (la Tierra brand is my all time favorite) or even pita pockets. I love a squeeze of lime and dash of chipotle powder on mine. Often, I don't even bother with a side dish for this, since you have the meat, rice, and vegetable toppings all rolled into one delicious package.

What are your favorite crock pot recipes?

Happy crock potting!

Thursday, June 9, 2011

Time to Hit the Sauce

If it ain't broke, don't fix it! While normally this describes my attitude about pasta and sauce, there are times when adding a little extra zip to traditional marinara is all it takes to turn a boring Tuesday night spaghetti dinner into something special.

Goat Week: Day 3

Pasta Margherita

This is a play on the original Pizza Margherita made with thin crust, fresh basil and buffalo mozzarella. The red, white, and green in the pasta version are marinara, goat cheese, and pesto. It's super quick and easy, and can be used on any type of pasta shape... and even on lasagna.

Depending on your level of commitment, you can do this with homemade marinara and homemade pesto sauces. Or, to keep it simple and quick, you can use jarred sauces.
  •  Start with your favorite marinara sauce simmering on the stove. 
  • Add in prepared pesto sauce (chopped basil, pine nut, olive oil and garlic) and mix. 
  • Next add a package of goat cheese (chevre) and stir until it is smooth and creamy. The sauce will be slightly pinkish.
  • To be honest, you can't really do it wrong. Just go according to your taste. In general 1 part pesto, 1 part goat cheese to 5 parts marinara will get you there. 


I'm fine with just pasta and sauce. But when I tell my husband we are having pasta for dinner, the first question is, "Does it have meat?" So if you are looking to add a protein to the dish, here are two delicious ideas.

Meat option #1: Italian Sausage
Brown the sausage, slice, and top your fettuccine.

Meat option #2: Chicken Breast
This is one of those times to cheat and use a rotisserie chicken to save time and trouble. Remove skin and cut the breast meat off of the bone. Or bake a few boneless, skinless chicken breasts with olive oil, salt, and pepper. Place on a bed of rigatoni and top with sauce.

Viola! Dinner is done.

Tuesday, June 7, 2011

Is that a party in your pepper?

It's summer... and it's HOT! There are many days this time of year when I crave something special, but have no desire to turn on the oven. Or even the toaster, for that matter. This simple yet sophisticated dish is a great snack, appetizer, or even side dish. It requires absolutely no cooking, and virtually no time to prepare. This makes it perfect for those impromptu neighborhood gatherings featuring cold beverages, lawn chairs, and snacks! The zesty flavor and freshness of these little guys is surprising... it's like a party in a pepper!

Mini sweet peppers stuffed with herbed goat cheese

Goat Cheese Stuffed Sweet Peppers (Goat Week: Day 2)
  • 1 package of sweet mini peppers (wash and dry)
  • 8 oz chevre (soft goat cheese)
  • balsamic vinegar (or glaze if you can find it)
  • extra virgin olive oil
  • sea salt
  • fresh cracked black pepper
  • fresh chopped basil or squeeze tube (optional)
  • black pepper
  • pinch of thyme (optional)
Roasted mini peppers stuffed with herbed goat cheese
There are two ways to prep the peppers. Either cut the tops off, empty seeds and stuff the whole empty pepper; or, slice in half lengthwise and fill the hollowed center. Sometimes the halved peppers are easier to bite through all the way and don't end up squirting the filling out. It also yields more servings which is helpful if you are entertaining and want to maximize the quantity of bites for the amount of ingredients.
In a bowl mix cheese, salt, pepper, and herbs to taste. Drizzle in a touch of olive oil and 2 teaspoons of balsamic vinegar. *If using the balsamic glaze do not add to mix, reserve it to finish the dish. Whip together with a fork, and spoon into peppers.

Now, you have two options here. You can serve them raw, chilled, crisp, and delicious at this point (with balsamic glaze drizzled over top if that is what you are using).
OR
You can put them in a 400 degree oven for about 20 minutes and roast the peppers, melting the cheese, to make a hot, savory, mouth-watering bite. Then drizzle with glaze and allow to cool slightly before serving.

Both versions are delectable!

Cherry tomatoes stuffed with herbed goat cheese filling. YUM!
But wait! There's more! You could also use cherry or roma tomatoes for this dish... just scoop out the seeds and fill. AND you could do the cold or roasted version with those as well. So here you have glorious goat cheese done four ways. I know I couldn't ask for more!


    Monday, June 6, 2011

    La semaine de la chèvre!

    I would eat it in a box, I would eat it with a fox. I would eat it in a car. I would eat it near or far.

    Chevre (goat cheese
    Actually, I love it on pizza, pasta, sandwiches, in salads and sauces, with fruit, eggs and veggies... What is this mystical and magical food? Goat cheese! Specifically Chevre. It's the tangy, creamy and smooth, spreadable cheese that comes in a log. And in an attempt to justify my insatiable appetite for this product, I am going to open my bag of tricks and dump it all out on the table. 

    Several years ago when I was first introduced to goat cheese, I shuddered a bit at the thought of it. It was just not something I had grown up eating, so it seemed odd. Here in the Midwest we are used to cow's milk products, and not much more exotic than that. But, to my delight, one of my favorite delicacies is becoming more and more mainstream and widely available. So whether you are a goat cheese aficionado, or reluctant virgin, I hope you'll find something you love.
    Enjoy "la semaine de la chèvre!"
     (Goat week sounds less appetizing in English) 

    Goat Week: Day One

    Ode-to-Chevre Brushetta 
    (contributed by the lovely Consetta)
    Bruschetta with goat cheese, olives, tomatoes and herbs

    • 1 baguette
    • 5 tablespoons olive oil
    • 2 lbs firm ripe tomatoes, diced
    • 1 1/2 tablespoons lemon juice
    • 1 1/2 teaspoons dijon mustard
    • 1/4 cup chopped Kalamata olives (pitted)
    • 3 tablespoons chopped basil
    • 2 cloves crushed garlic
    • 6 oz Chevre cheese
    • salt and pepper to taste

    Slice baguette, drizzle with olive oil, bake at 425 for 5 minutes. Once cool, spread Chevre on each slice of baguette. In mixing bowl add all other ingredients and mix, spoon over Chevre and serve.

    Sunday, June 5, 2011

    Marry Me!

    I LOVE steak. Juicy, rare, and right off of the grill. And right now it's prime grilling season! In fact, as I type this, there is a giant, thick cut sirloin marinading in the fridge. My mouth is watering just thinking about it!

    I have found that there are two kinds of steak eaters in the world. The first is the traditional set that subscribes to the belief that simplicity is best. My husband is one of these. He doesn't like anything but a simply seasoned piece of meat. He is happy with some kosher salt, pepper, and olive oil. And I agree it is tasty, and even fantastic for chicken, pork, or fish. But I stand firmly with the second group of steak eaters: those that enjoy creative and bold seasonings and sauces. If I were to have a celebrity chef prepare my steak, I'd choose Bobby Flay.

    Whichever team you are on, I have a marinade recipe for you to test at your next cookout. It adds enough flavor for bold and spicy craving carnivores like me, but is not overpowering enough to put off the traditional meat eaters. It's a lovely compromise. And compromise is the key to any successful relationship. Steak eaters- unite!

    Depending on your taste preferences, you can go a little easy or extra heavy on specific ingredients. Normally I am a rib-eye loving girl, but this marinade makes even an inexpensive sirloin scrumptious. We used one large steak that can serve 2-4 diners, and this is enough marinade. Adjust quantity and measurements for your needs and tastes!
    • olive oil 1/3 cup roughly
    • apple cider vinegar 1-2 cap fulls
    • Worcestershire sauce 2-3 tablespoons
    • soy sauce (either go really easy on this, or use the lite/low sodium to avoid over saltiness) 2 teaspoons
    • prepared horseradish 1 teaspoon
    • fresh garlic 3-4 cloves
    • kosher or sea salt
    • black pepper
    • fresh or dried basil and (flat leaf) parsley 2-3 tablespoons dried or a handful of fresh
    Add all ingredients to food processor if using fresh whole garlic cloves and herbs, and pulse until it's all finely chopped. If using dried herbs and you don't mind chopping garlic (or are using the jarred minced garlic) then you can simply whisk it together or shake it well in a container with lid. Then pour marinade over meat in a glass baking dish, or into large plastic bag. Refrigerate and allow to marinate for up to 8 hours. The longer it sits, the more the flavors will marry and tenderize the meat. For a zesty topping or dipping sauce, whisk together a teaspoon of horseradish or wasabi, few drops of honey, and few tablespoons of Worcestershire sauce.

    I have recently become a grilling ninja, and have learned lots of tips and secrets that make any steak at home as delicious and appealing as any from a restaurant. Perhaps you are already a grill master and know what I'm about to tell you. Well goody for you! These are things I've leaned from my favorite chefs and from my own experimenting.
    1. When marinating steak in the refrigerator, it's important to remove it up to an hour before you plan to grill and allow the meat to come to room temperature to help it to cook evenly. That's important because it prevents well done steak from burning on the outside and drying out. It will also help a rare to medium rare steak get a nice sear on the outside and a warm, juicy center. I love a rare steak, but a cold, raw center is not appealing! 
    2. Preheat the grill with all burners on high for at least 15 minutes, and use a steel brush to clean the grates. This will get you a good sear on the meat with those pretty grill marks and avoid that gas smell and taste meat absorbs if you put it on too soon. 
    3. Only turn the meat once! And keep the grill closed as much as possible. This keeps the cooking temperature even. When it is time to flip, use an open area on the grate for a good sear on the second side and more good grill marks! Second side takes less time, so don't go too long. You can always put it back on, but if you over cook it, you're stuck with it.
    4. Let the meat rest! And avoid the temptation to cut into it to check the doneness. Let it sit, loosely covered, for 5 minutes before doing any cutting. The juices will redistribute and it will finalize the cooking process.


    Enjoy!